 The first part of this little felted purse KAL took the process as far as the top trim (lavender in color) which grows out of the zipper tape according to the new method of attaching knitting to zippers using a tiny latch-hook, called a "knitpicker."
This method is further described in the Winter 2010 issue of Interweave Knits.
This second installment of the KAL will show how to make the body of the purse, starting with the green yarn. (Of course, you can make the whole purse one color, or striped in many colors--whatever you like! The model just uses green as a contrast color to make clear which is the top and which is the bottom of the work.)
There are a lot of words and several illustrations, but only because it's SO much harder to describe in words and pictures what would take a moment to demonstrate in real life. In other words, don't be put off by the seeming complexity, it really is very simple to DO, just hard to DESCRIBE.
Part 2: Body of purse
Superwash foundation round for feltable yarn: Cut a 60" length of superwash wool and double it. At the lowest level (where the fabric from the zipper tape lies) insert crochet hook from the outside of the tape (no teeth) toward the inside (where the teeth are), and draw doubled loops through the base of the superwash trim--purl side of trim should face you.
As shown in the above schematic, one doubled loop is drawn between each stitch originally picked up with the latch hook in part 1 of this KAL. If the work is tight and the crochet hook is not working very well, you can resort back to the knitpicker latch hook to pull the doubled yarn between the stitches, particularly the tight stitches on the ends of the zipper tape.
The yarn in the above schematic is illustrated in two colors so you can distinguish the two stands, but in real life, both strands are the same color as each other and the same color as the superwash trim. This is so that the picked up stitches will not show in a different color against the trim.
Below is another take on the pick-up process, again showing how the loops of the body of the purse are being pulled through the base of the trim. This is a double cut-away illustration. The inner box (light background) shows the zipper tape with the purl fabric of the trim arising out of it. In the outer box (darker background) the purl fabric has been cut away so you can see the relationship of the drawn-through loops to the underlying zipper tape, as well as to the trim itself. Note that in both the illustration above as well as the illustration below, the new loop is being drawn out between the bottom stitches of the trim, not through them. (If you click on this--or any other--illustration, it will enlarge.)

The above illustration does not show the loops being deposited on the dpn because only the first draw-through is illustrated. The schematic illustration earlier in this post, showing several stitches picked up, does show how these loops are to be deposited on the dpn as you go around. The dpn set to use for this pick up is the smaller dpn's--the same ones you knit the trim with.
The opening schematic also shows where to begin the pick up.
Add additional dpn's as you draw loops up all around. You'll wind up with 32 doubled loops on your smaller dpn's.
Increase stitch count: Switch to larger dpn's and ordinary, feltable woolen yarn. Using a fifth dpn from the larger set, knit around the stitches picked up. Note that some doubled loops are to be knit each separately, so that the doubled loop gives rise to two stitches, while other doubled loops are to be knit by knitting both loops as one, so that the doubled loop gives rise to only one stitch.

Specifically, in the above schematic, where a red "2" appears, you are to knit each of the two loops separately to give rise to 2 separate stitches; where a blue"1" appears, you are to knit the two loops in that location as one, to give rise to a single stitch. As you can see, there are only 4 single stitches, basically on either side of the center of the zipper tapes. This long straight run of stitches does not require the ease necessary closer to the corners, which is the reason for the single stitches at this location. In all, you'll have 56 stitches, which could conveniently be arranged onto 4 dpn's of 14 st each.
As you go around, you may find it easier to open the zipper--this literally "opens up" the work, making the knitting much easier.
Knit body of purse: Knit 4 rounds of contrast color (green on sample). Switch to main color. Work a total of 19 rounds altogether not including superwash foundation round.
Next, purl one round.
(The switch between colors, as well as the knit/purl switch can be made jogless.)
Next, knit 9 additional rounds, ending on a column centered under the zipper split in the zipper tapes. Place half the stitches on 1 needle, half on another, with the division between the stitches being parallel to the direction of the zipper.
In other words, the two needles are to be arranged so that one needle carries all the stitches arising out of the left side of the zipper tape, while the other needles carry the stitches arising out of the right side of the zipper tape.
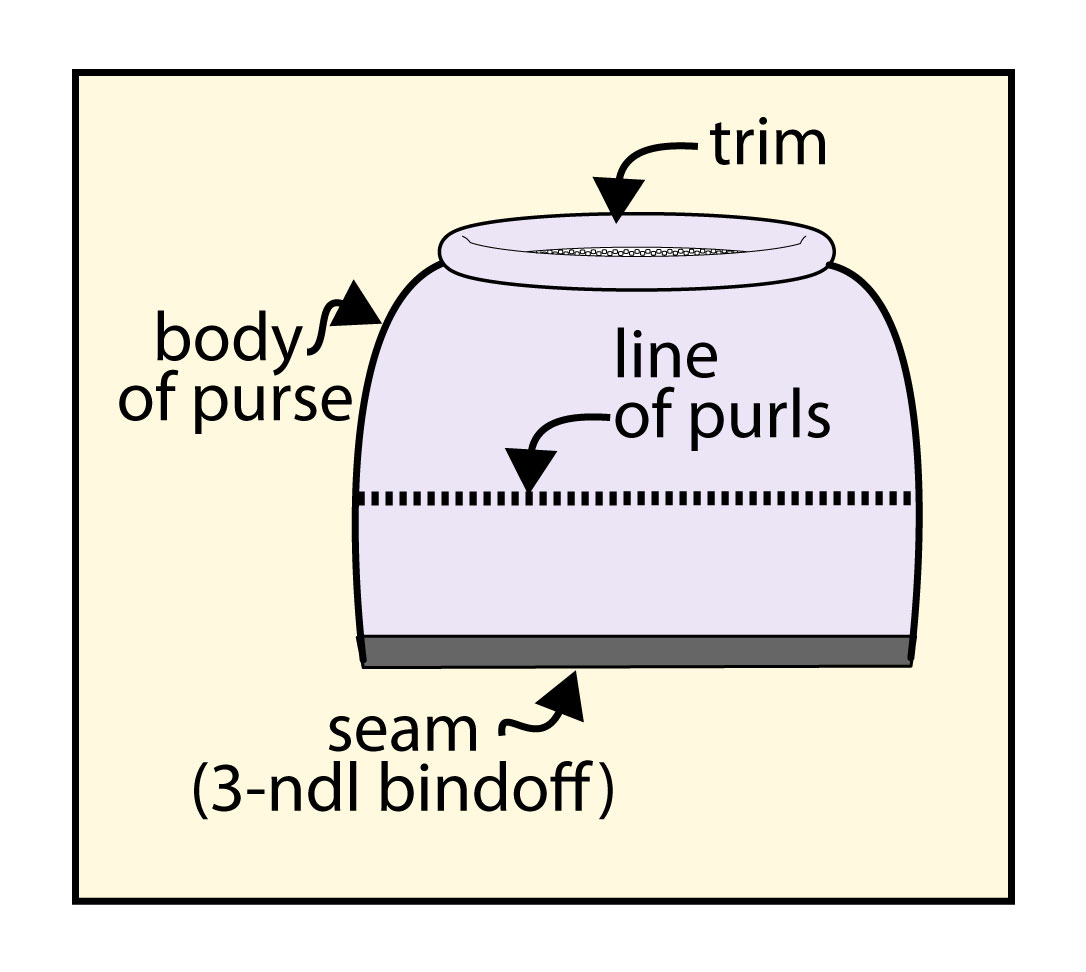
Hold one needle behind the other. Using three-needle bind off, bind off both halves together VERY LOOSELY! Your final result is represented by the below schematic.
Perfectionists can turn the purse inside out to bind off from inside. Some finagling is needed to get the needles through the zipper opening, but it can be done. Leave a 10" tail after bind-off is complete.
In the next post, we'll flatten the purse bottom, felt the purse and attach the zipper pull.
--TK
* * *
This is the second in a three-part series.
You have been reading TECHknitting on: Feltable Purse KAL part 2: no sew zippers in knitwear.